

How To Get Good Lighting With Ring Light?
Achieving good lighting with a ring light is essential for creating professional-quality photos, videos, or live streams. Whether you're a content creator, a makeup artist, or someone who simply wants to look their best during virtual meetings, mastering the use of a ring light can make a significant difference in your results. In this article, we’ll explore practical tips and techniques to help you get the most out of your ring light and achieve optimal lighting for your needs.
Understanding the Basics of Ring Lights
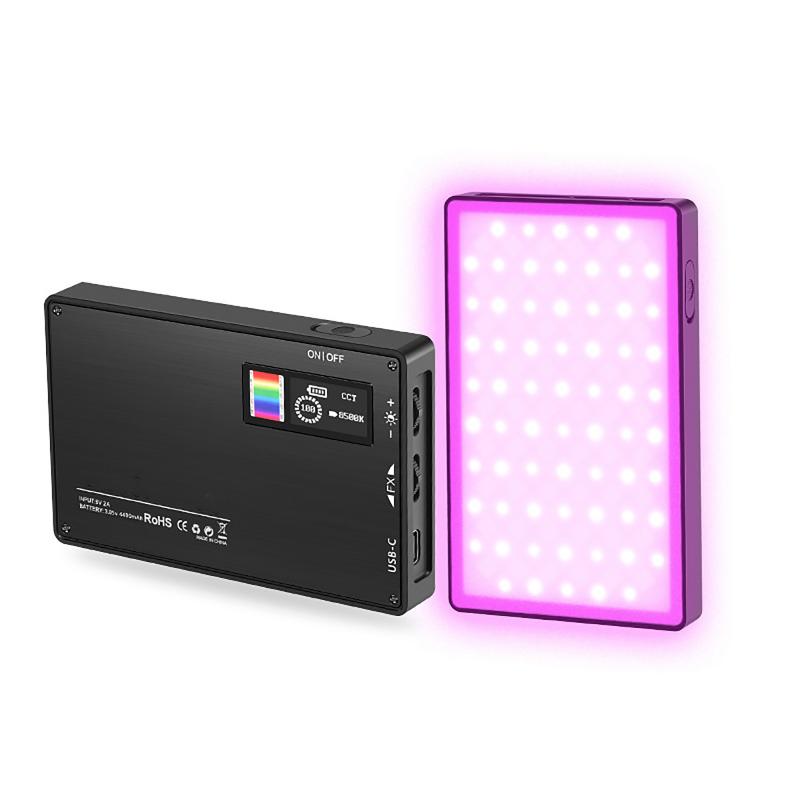
A ring light is a circular lighting device that emits even, diffused light. Its design minimizes shadows and creates a flattering glow, making it ideal for close-up work such as portraits, makeup tutorials, or product photography. The circular shape also produces a unique catchlight in the eyes, which is highly desirable in portrait photography and video production.
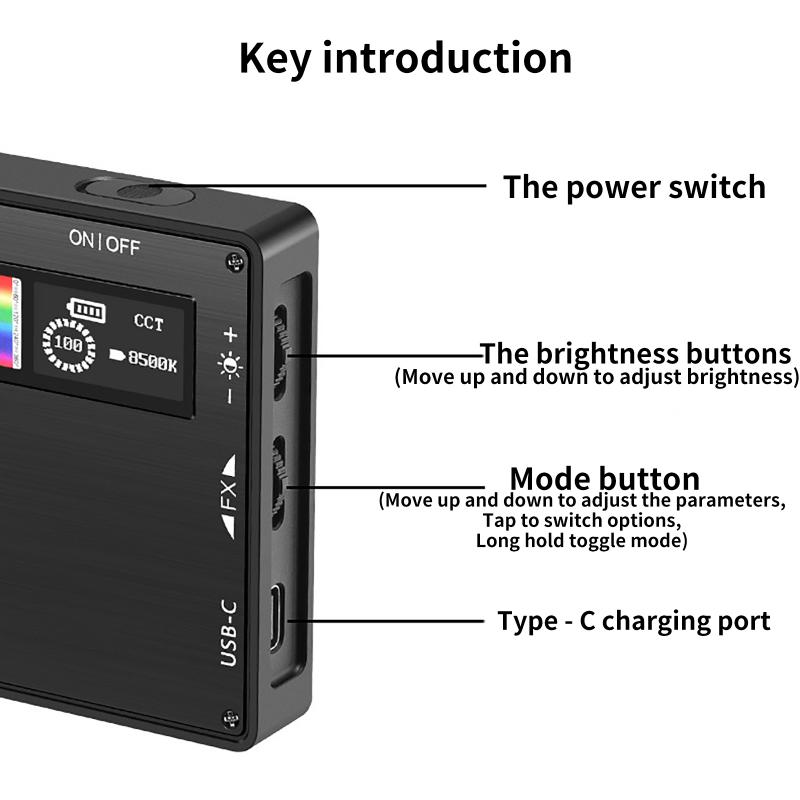
Ring lights come in various sizes, brightness levels, and color temperature options. Some models are equipped with adjustable settings, while others are more basic. Regardless of the type you own, the principles of using a ring light effectively remain the same.
Step 1: Positioning Your Ring Light
The placement of your ring light is crucial for achieving good lighting. Here are some key considerations:
1. Height and Angle: Position the ring light at eye level or slightly above. This ensures that the light evenly illuminates your face or subject without casting harsh shadows. If the light is too low, it can create unflattering shadows under the chin; if it’s too high, it may cast shadows on the forehead.
2. Distance: The distance between the ring light and your subject matters. Typically, the ring light should be placed 1 to 2 feet away from your face or object. If it’s too close, the light may appear overly harsh; if it’s too far, the illumination may be insufficient.
3. Centered Placement: For the best results, position the ring light directly in front of your subject. This ensures even lighting and eliminates shadows. If you’re using a phone or camera, place it in the center of the ring light using a mount or tripod.
Step 2: Adjusting Brightness and Color Temperature
Most modern ring lights come with adjustable brightness and color temperature settings. These features allow you to customize the lighting to suit your environment and desired effect.
1. Brightness: Start by setting the brightness to a moderate level. If you’re in a dimly lit room, you may need to increase the brightness. Conversely, if you’re in a well-lit space, a lower brightness setting may suffice. Avoid setting the brightness too high, as it can wash out your features or create glare.
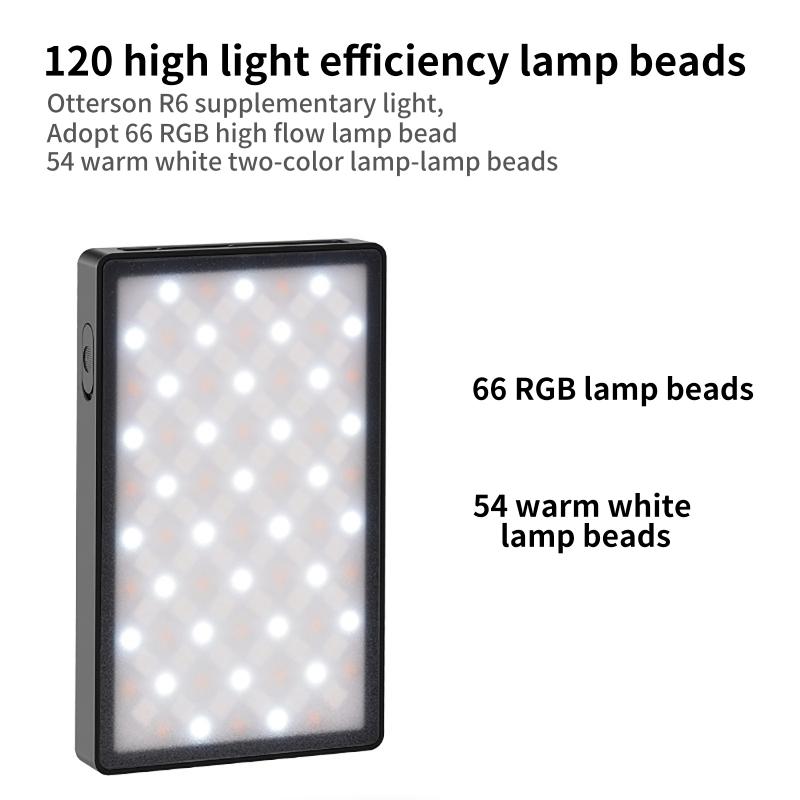
2. Color Temperature: Ring lights often offer options for warm, neutral, or cool light. Warm light (yellowish tones) is ideal for creating a cozy, natural look, while cool light (bluish tones) is better for a crisp, professional appearance. Neutral light (white tones) strikes a balance between the two. Experiment with different settings to find the one that complements your skin tone and the mood you want to convey.
Step 3: Eliminating Shadows and Glare
One of the main advantages of a ring light is its ability to minimize shadows, but improper use can still result in unwanted effects. Here’s how to avoid common issues:
1. Avoid Overexposure: If the light is too bright or too close, it can create glare or make your skin appear overly shiny. Use a diffuser or adjust the brightness to soften the light.
2. Check Background Shadows: While the ring light may illuminate your subject perfectly, it can cast shadows on the background. To prevent this, ensure your background is evenly lit or use additional lighting sources to balance the scene.
3. Use a Diffuser: Some ring lights come with built-in diffusers, while others may require an external attachment. A diffuser softens the light and reduces harshness, creating a more natural and flattering effect.
Step 4: Enhancing Your Setup
To maximize the effectiveness of your ring light, consider enhancing your overall setup. Here are some tips:
1. Combine with Other Lights: While a ring light is excellent for front-facing illumination, adding side or backlighting can create depth and dimension. For example, use a softbox or LED panel as a secondary light source to highlight your hair or background.
2. Choose the Right Background: A cluttered or overly bright background can detract from the impact of your ring light. Opt for a clean, neutral background that complements your subject.
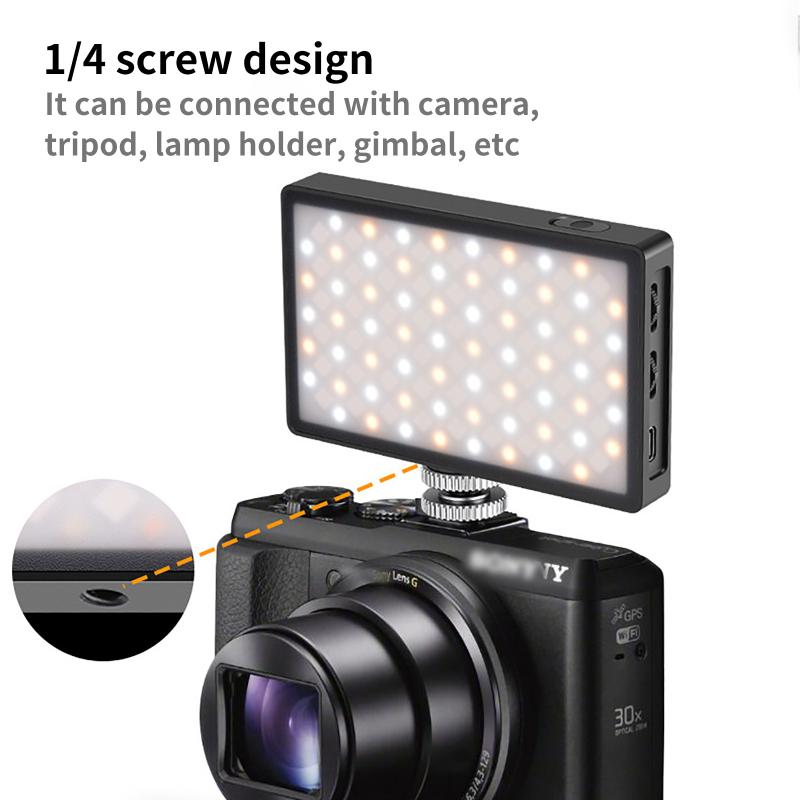
3. Use a Tripod or Stand: Stability is key when using a ring light. A tripod or adjustable stand ensures that your light remains steady and properly positioned throughout your shoot or session.
Step 5: Optimizing for Specific Applications
The way you use your ring light may vary depending on your specific needs. Here are some tailored tips for common applications:
1. Makeup Tutorials: When applying makeup, position the ring light slightly above eye level to mimic natural lighting. Use a warm or neutral color temperature to ensure accurate color representation.
2. Photography: For portrait photography, experiment with different angles and distances to achieve the desired effect. You can also use the ring light as a fill light in combination with other lighting sources.
3. Video Calls and Streaming: For virtual meetings or live streams, ensure the ring light is centered and at eye level. Adjust the brightness and color temperature to match the ambient lighting in your room.
4. Product Photography: When photographing small objects, place the ring light close to the subject for detailed illumination. Use a diffuser to avoid harsh reflections on shiny surfaces.
Step 6: Troubleshooting Common Issues
Even with the best setup, you may encounter challenges when using a ring light. Here’s how to address them:
1. Uneven Lighting: If the light appears uneven, check the positioning and angle of the ring light. Ensure it’s centered and at the correct height.
2. Glare on Glasses: If you wear glasses, the ring light may create reflections. To minimize glare, adjust the angle of the light or use an anti-reflective coating on your lenses.
3. Skin Shine: If your skin appears shiny under the ring light, apply a mattifying powder or adjust the brightness to reduce the effect.
Step 7: Maintenance and Care
To ensure your ring light performs optimally over time, follow these maintenance tips:
1. Clean Regularly: Dust and smudges can affect the quality of the light. Clean the surface of the ring light with a soft, dry cloth.
2. Store Properly: When not in use, store your ring light in a safe, dry place to prevent damage.
3. Check Connections: If your ring light is powered by a USB or adapter, ensure the connections are secure and functioning properly.
A ring light is a versatile and powerful tool for achieving professional-quality lighting in various applications. By understanding its features, positioning it correctly, and optimizing your setup, you can create stunning visuals that enhance your content or appearance. Whether you’re a beginner or an experienced user, these tips will help you make the most of your ring light and elevate your results. With practice and experimentation, you’ll soon master the art of lighting and take your photography, videos, or live streams to the next level.
 Ring Light with 78.7 inch (200cm) Tripod and Phone Holders, 3 Color Modes, Bluetooth Remote Control Photography Lighting (Only Ship to US)")
")

")


")


, A9, a6600, a7R IV, Alpha a9 II (2-Pack, Micro USB Port, 2280mAH)")


")


