
Neutral Density Filter: The Ultimate Guide for Photographers and Videographers
If you’ve ever taken photos on a bright day and struggled to control exposure, you’ve likely heard about a neutral density filter. Whether you shoot with a DSLR, mirrorless camera, GoPro, or iPhone, a neutral density filter can transform your photography. In this guide, we’ll explain what a neutral density filter is, what it does, when to use it, and how to use a neutral density filter effectively — so you can capture professional, cinematic shots anytime, anywhere.
What Is a Neutral Density Filter?
A neutral density filter (often shortened to ND filter) is like a pair of sunglasses for your camera. It’s a piece of optical glass or resin that reduces the amount of light entering your lens without affecting color or contrast. In simple terms, a neutral density filter allows you to use slower shutter speeds or wider apertures in bright light — giving you creative control over exposure.
In neutral density filter photography, the goal is to balance light to achieve effects that would otherwise be impossible under strong lighting conditions. For example, you can blur moving water, soften clouds, or create cinematic motion blur in video.
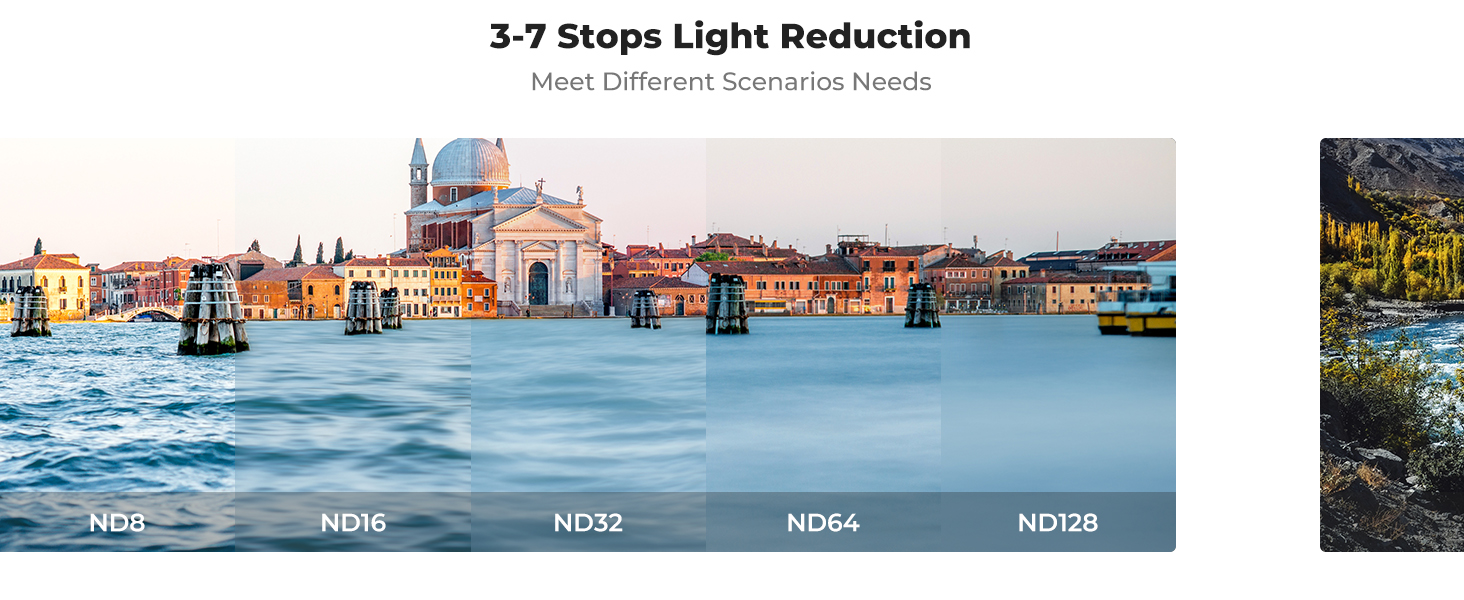
A camera neutral density filter comes in different strengths (ND2, ND4, ND8, ND1000, etc.), which represent how much light the filter blocks. The higher the number, the darker the filter and the stronger the light reduction.
If you’re using mobile gear, a neutral density filter iPhone setup works the same way — it helps you take long-exposure shots or cinematic videos, even under harsh sunlight. Brands like K&F Concept offer neutral density filter kits designed specifically for phones and action cameras.
So, what is a neutral density filter used for? It’s used whenever you need to control light to maintain creative flexibility. It doesn’t just darken your image — it gives you artistic freedom.
What Does a Neutral Density Filter Do?
Let’s break down what a neutral density filter does and how it enhances your shots.
1. Controls Exposure in Bright Conditions
The main job of a neutral density filter is to reduce light. This lets photographers use slower shutter speeds or wider apertures even in daylight, preventing overexposure. Whether you’re photographing waterfalls or cityscapes, you’ll notice smoother textures and balanced highlights.
2. Creates Motion Blur Effects
A neutral density filter allows long exposures that blur motion beautifully. Waterfalls appear silky, clouds stretch across the sky, and traffic lights form artistic trails. That’s the magic of neutral density filter photography.
3. Enables Shallow Depth of Field in Sunlight
Shooting portraits outdoors? A camera neutral density filter lets you open your aperture (like f/1.8 or f/2.8) to create dreamy background blur, even under strong sunlight.
4. Improves Video Quality
Videographers love neutral density filters for maintaining cinematic motion blur. Following the 180-degree rule, if your video frame rate is 30 fps, your shutter speed should be 1/60 sec. On bright days, a neutral density filter helps you achieve that without overexposure. It’s essential for neutral density filter GoPro setups and drone filming too.
In short, what does a neutral density lens filter do? It controls light intensity while maintaining natural color and detail — unlocking professional-quality images in challenging lighting conditions.
When to Use a Neutral Density Filter?
You might wonder: when should I use a neutral density filter? The answer depends on your creative goals. Here are some ideal situations to use it:
1. Long Exposure Landscapes
If you’ve seen dreamy waterfall photos or ocean waves that look silky smooth, that’s neutral density filter photography in action. Using ND filters like ND64 or ND1000 lets you extend shutter speed, even under midday sun.
2. Portraits in Bright Light
When shooting portraits outdoors, harsh light can force you to use small apertures, losing the soft background blur. A camera neutral density filter allows you to shoot wide open while keeping exposure balanced.
3. Cinematic Videography
If you shoot videos with a GoPro, drone, or smartphone, you’ll need a neutral density filter GoPro or neutral density filter iPhone kit. ND filters maintain proper motion blur, making your footage look smoother and more natural.
4. Cityscapes and Street Photography
For moving crowds or traffic, ND filters let you capture artistic motion blur while keeping static elements sharp. It adds storytelling depth to your shots.
5. Sunset and Sunrise Shots
Using a neutral density filter set at golden hour helps balance exposure between bright skies and darker foregrounds, creating more dynamic compositions.
Whether you’re a beginner or pro, learning when to use a neutral density filter is key to mastering light control and elevating your photography.
How to Use a Neutral Density Filter?
Now that you know what a neutral density filter is and what it does, let’s go over how to use a neutral density filter properly.
1. Choose the Right ND Filter Strength
ND filters come in various strengths, typically ranging from ND2 (1-stop light reduction) to ND1000 (10 stops). The darker the filter, the longer your exposure can be. For example:
ND8 (3 stops): Great for bright outdoor portraits.
ND64 (6 stops): Ideal for waterfalls or moving clouds.
ND1000 (10 stops): Perfect for long-exposure landscapes.
A neutral density filter kit often includes multiple ND levels, so you can adapt to different lighting conditions.
2. Mount the Filter Correctly
Simply screw or snap the neutral density filter onto your lens. For smartphones or action cameras, use a compatible neutral density filter set designed for your device. Ensure the filter is clean and aligned to prevent vignetting or color cast.
3. Adjust Camera Settings
Once attached, adjust your shutter speed, aperture, and ISO manually. Start with ISO 100 and aperture between f/8–f/16 for landscapes. Then lengthen your shutter speed to achieve the desired motion blur.
4. Use a Tripod
Since neutral density filters require slower shutter speeds, use a tripod to prevent camera shake. Stability is crucial in neutral density filter photography.
5. Experiment with Exposure Times
Try different exposure lengths to get creative results. A few seconds can blur water smoothly, while 30 seconds or longer can make skies appear surreal.
Learning how to use a neutral density filter effectively takes practice — but once you master it, your shots will instantly stand out.
Choosing the Best Neutral Density Filter
If you’re looking for the best neutral density filter, consider factors like optical quality, coating, and compatibility.
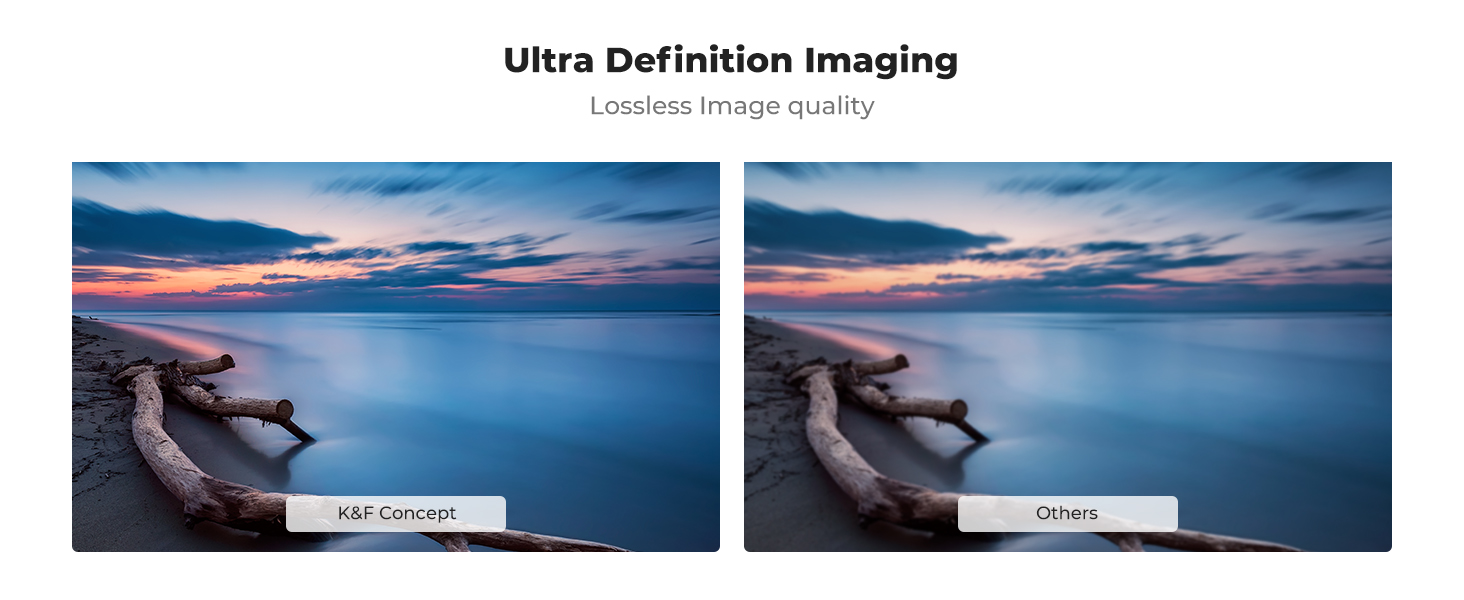
v Optical Quality: High-grade glass ensures sharp, color-accurate results. Brands like K&F Concept offer professional-grade ND filters with multi-layer coatings that reduce reflections and flares.
v Versatility: A neutral density filter kit or neutral density filter set gives you multiple strength options for different situations.
v Device Compatibility: Whether you use a DSLR, mirrorless camera, GoPro, or iPhone, there’s a suitable ND filter for your needs.
v Value for Money: Look for the best buy neutral density filter options that combine performance and affordability.
For professionals, variable ND filters are a flexible choice. They let you adjust light reduction by rotating the filter — perfect for fast-paced shooting.
Neutral Density Filter Photography Tips
To get the most from your neutral density filter photography, keep these expert tips in mind:
1. Use a remote shutter or timer to avoid vibrations.
2. Block viewfinder light leaks with a cover or tape.
3. Shoot in RAW for maximum editing flexibility.
4. Stack filters carefully — avoid using polarizers and ND filters together unless necessary.
5. Clean regularly with a microfiber cloth to maintain image clarity.
Whether you’re using a camera neutral density filter, a neutral density filter iPhone setup, or a neutral density filter GoPro, mastering technique matters more than gear alone.
Conclusion:
A neutral density filter is an essential tool for any serious photographer or videographer. It helps control light, manage exposure, and unleash creative possibilities that can’t be achieved otherwise.
From capturing silky waterfalls to cinematic motion blur, understanding what a neutral density filter does, when to use it, and how to use a neutral density filter can dramatically elevate your visual storytelling.
If you’re ready to enhance your photography, explore K&F Concept’s premium neutral density filter kits —precision-engineered for DSLRs, mirrorless cameras, GoPros, and smartphones. Find your best buy neutral density filter and start creating stunning, professional-grade images today.
")

 Variable Neutral Density and Polarizer for Camera Lens Nano-Dazzle Series")


")


 Filter Number Mean and How to Purchase One?")


