
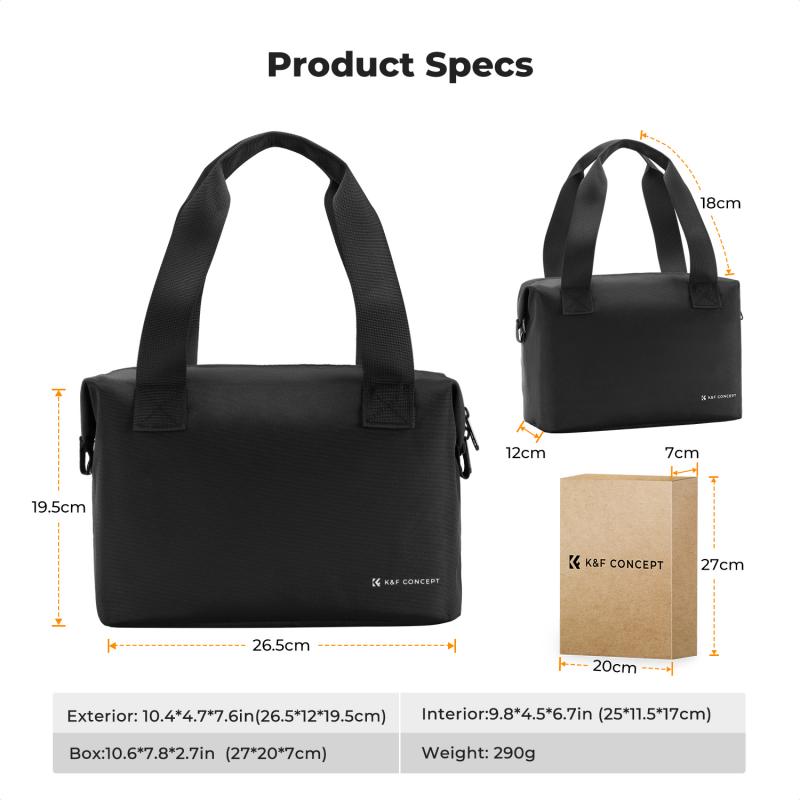
What Is Nd Filter On Video Camera?
Neutral Density (ND) filters are essential tools in the filmmaking and videography world that allow videographers to control light exposure without altering the color or quality of their footage. ND filters are popular among professionals trying to achieve creative effects or maintain consistent quality under varying lighting conditions. While they might sound intimidating at first, understanding their purpose and practical applications can significantly elevate your video skills. Here's a breakdown of what ND filters are, how they work, and why they are indispensable for video production.
What Is an ND Filter?
An ND filter, short for Neutral Density filter, is a physical filter that you place over your camera lens to reduce the amount of light entering it. This reduction in light happens uniformly across the frame, with no impact on the colors or tones in the image. It’s like sunglasses for your camera lens, allowing you to work with bright lighting conditions without overexposing your footage. ND filters help retain the integrity of exposure while working with wide apertures or slow shutter speeds, which are essential for creative effects like shallow depth of field or motion blur.
Why Are ND Filters Important for Videography?
When recording video, achieving proper exposure is crucial. Unlike photography, where you can adjust exposure for individual frames, video requires consistent exposure throughout the sequence. If your lighting conditions are too bright—like shooting outdoors on a sunny day—the amount of light entering the camera may overwhelm your settings, resulting in overexposed footage. This is where ND filters come into play.
Key Benefits of ND Filters for Video Cameras:
1. Control Exposure in Bright Environments: ND filters block excessive light in situations like direct sunlight, allowing you to maintain standard camera settings like aperture and shutter speed for proper video exposure.
2. Maintain Cinematic Settings: Filmmakers often aim for a "cinematic look" by setting their shutter speed based on the frame rate (following the 180-degree rule: shutter speed = double the frame rate). ND filters allow you to stick to these optimal settings, even in bright conditions.
3. Enable Creative Techniques: Shooting with wide-open apertures (for shallow depth of field) or slow shutter speeds (for smooth motion blur) often results in too much light hitting the sensor during the day. ND filters ensure you can achieve these effects without sacrificing exposure quality.
4. Prevent Overexposure: Overexposed highlights and blown-out skies are common issues when shooting video in high lighting conditions. ND filters ensure a balanced exposure and preserve detail in bright areas.
How Do ND Filters Work?
ND filters work by reducing the intensity of light entering your lens. They are graded by strength, which is indicated by either an ND number or a f-stop reduction value. The higher the ND rating, the darker the filter, and the greater its ability to block light.
For example:
ND2 Filter: Reduces light by 1 f-stop (50% light blocked).
ND4 Filter: Reduces light by 2 f-stops (75% light blocked).
ND8 Filter: Reduces light by 3 f-stops (87.5% light blocked).
On the other hand, variable ND filters let you adjust the darkness level, giving you more control without swapping filters during the shoot. This versatility makes them a favorite with videographers who move between different lighting conditions.
Practical Uses for ND Filters in Video Cameras
1. Create Motion Blur with Slow Shutter Speeds
To achieve smooth, natural movement in your videos, filmmakers often reduce their shutter speed. For example, if you’re shooting at 30 frames per second (fps), you’ll set your shutter speed to 1/60 of a second to produce motion blur. If you’re filming outdoors during the day, this slow shutter speed might overexpose your footage due to the excess light. By using an ND filter, you can control the exposure while maintaining your desired shutter speed.
2. Film with Shallow Depth of Field
A shallow depth of field (where your subject is sharp while the background is blurred) is achieved by using wider apertures, like f/1.8 or f/2.8. However, wide apertures let in a lot of light, which can result in overexposure—especially in bright environments. Introducing an ND filter decreases the amount of light entering your lens, helping you achieve a beautifully blurred background without compromising exposure quality.
3. Shoot Daytime Time-Lapses
ND filters are useful for creating smooth, dramatic time-lapse videos during daylight hours. By enabling longer exposure times, ND filters help blur moving subjects like clouds or water while achieving cinematic time-lapses without overexposing the frame.
4. Balance Bright Highlights and Shadows
Bright lighting environments, such as direct sunlight, often create high-contrast scenes where shadows are underexposed and highlights are blown out. ND filters help to balance exposure across the entire image, allowing you to capture smooth and detailed footage in challenging lighting conditions.
Types of ND Filters
There are two main types of ND filters, and each has its own advantages depending on your filmmaking needs:
1. Fixed ND Filters:
These filters provide a constant amount of light reduction (e.g., ND4, ND8). They are simple to use and can deliver consistent results. However, if lighting changes during your shoot, you may need to swap out filters.
2. Variable ND Filters:
These filters allow you to adjust the strength of light reduction by rotating the filter ring (like a polarizer). Variable ND filters are versatile and convenient, especially for dynamic environments with fluctuating light conditions.
Key Considerations When Using ND Filters
1. Filter Compatibility: Ensure that the ND filter matches your camera lens’s diameter size. Filters come in varying sizes (e.g., 52mm, 77mm) to fit different lenses.
2. Quality Matters: Cheap ND filters can degrade image quality, causing color shifts or uneven exposure. Invest in high-quality filters from reputable brands to avoid such problems.
3. Avoid Vignetting: With certain lenses, the edges of the frame may look darker than the center due to the filter size or strength. To minimize vignetting, choose a slim ND filter or correctly sized filter for your lens.
4. Evaluate Lighting Conditions: Select an ND filter strength (ND2, ND4, ND8, etc.) based on how bright your shooting environment is. Variable ND filters can simplify this process.
5. Pair with Other Filters: ND filters can be combined with other filters, such as polarizing filters, to enhance your footage further (e.g., controlling glare from reflective surfaces).
When Do You Need an ND Filter?
If you're facing any of the following scenarios while shooting video, an ND filter is your go-to solution:
- You're filming outdoors and struggling with overexposure caused by bright sunlight.
- You want to use slower shutter speeds for cinematic motion blur.
- You aim to achieve a shallow depth of field with a wide aperture but the footage is overexposed.
- You’re shooting a time-lapse in bright daylight and want dynamic, natural-looking movement in your scene.
- You’re facing challenging lighting conditions where both highlights and shadows need balancing.
ND filters are indispensable tools for videographers, enabling precise light control without compromising the visual quality of your footage. Whether you're shooting outdoors in bright sunlight, working on creative projects that require slow shutter speeds or wide apertures, or creating dramatic time-lapses, ND filters offer unmatched versatility to enhance your videos.
Investing in high-quality ND filters tailored to your shooting style and lighting environment can make an enormous difference in your video production process. By understanding how and when to use ND filters effectively, you’ll be equipped to tackle common exposure challenges and unlock your creative potential as a filmmaker.


 For All Phone Set")
 ND8 ND16 ND32 ND64 Snap On Multi-Coated HD Optical Glass Neutral Density Drone Camera Lens Filter Accessories")


")
 HD Optical Glass with 28-Layer Coating, Standard IR Filter for Unmodified Cameras to Shoot Surreal Landscape and Black & White Photography - Nano-Xcel Series")

 Anamorphic Lens Effect Filter Optical Glass Ultra-clear Waterproof Anti-Scratch Anti-Reflection Green Film Nano-Klear Series")
 Variable ND Filter and CPL Circular Polarizing Filter 2 in 1, 28 Layers Coated Nano-Xcel Series")

 Optical Glass Ultra-clear Waterproof Anti-Scratch Anti-Reflection Green Film Nano-X Series")


