
How To Fix Camera On Tripod Stand?
Mastering the Art of Tripod Setup: A Comprehensive Guide to Fixing Your Camera Securely
Tripods are indispensable tools for photographers and videographers, enabling steady shots, creative compositions, and professional-quality visuals. However, if you’re unfamiliar with securing your camera to a tripod, the process can feel tricky and unintuitive. This guide will walk you through the steps of fixing your camera onto a tripod stand while addressing common challenges and offering practical solutions. By the end of this article, you’ll not only know how to attach your camera securely but also understand how to optimize your setup for various shooting scenarios.
---
1. Understanding the Components of a Tripod
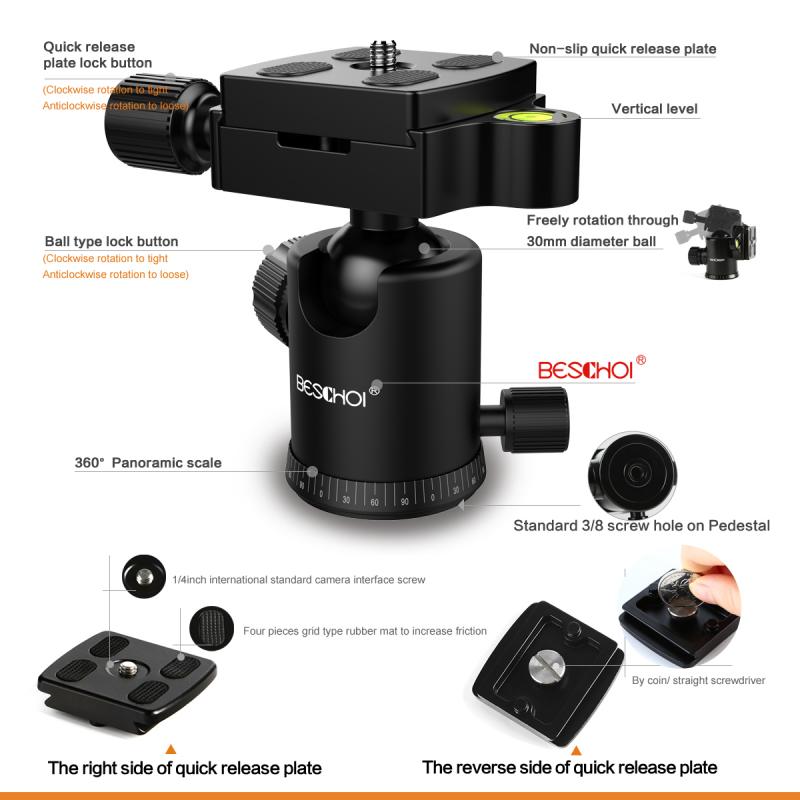
To fix your camera on a tripod stand effectively, it’s essential to familiarize yourself with its parts:
- Tripod Legs: Provide stability and can often be adjusted for height and angle.
- Head: The part where your camera is mounted. Common types include ball heads, pan-and-tilt heads, and fluid heads.
- Quick Release Plate (QR Plate): A detachable platform that connects your camera to the tripod.
- Center Column: An adjustable column that can extend vertically for additional height.
- Locking Mechanisms: Knobs or levers that secure the tripod legs, head, and camera in place.
By understanding these components, you’ll better grasp how they work together to support your camera.
---
2. Preparing Your Tripod for Setup
Before attaching your camera, ensure your tripod is ready:
1. Unfold and Extend the Legs: Position the tripod legs for stability, keeping them evenly spaced. Adjust the height to match your shooting needs, but avoid extending the center column unnecessarily, as this can reduce stability.
2. Secure the Locks: Tighten the leg locks or clasps to prevent movement. Confirm that the tripod head is firmly attached to the legs.
3. Level the Tripod: Many tripods include a bubble level. Ensuring the tripod is level helps avoid tilting and uneven framing.
---
3. Attaching the Quick Release Plate
The QR plate serves as the intermediary between your camera and the tripod head. Here’s how to attach it:
1. Locate the Mounting Screw: The QR plate has a screw that fits into your camera’s tripod socket, typically located at the bottom of the camera body.
2. Align the QR Plate: Position the plate so the screw lines up with the camera’s socket. Some QR plates also have rubberized grips to prevent slipping.
3. Secure the Plate: Tighten the screw using your fingers, a coin, or a dedicated tool. Ensure it’s snug but not overtightened, as this could damage the threads.
4. Double-Check Alignment: Ensure the plate is flush against the camera base and not tilted.
---
4. Mounting the Camera onto the Tripod
Once the QR plate is attached, follow these steps to mount your camera:
1. Unlock the Tripod Head: Most tripod heads have a locking mechanism for the QR plate. Open it to insert the plate.
2. Insert the QR Plate: Slide or clip the plate into the tripod head, depending on the design. You should hear or feel a click when it’s secure.
3. Lock the Plate in Place: Tighten the locking mechanism to hold the plate firmly. Wiggle the camera gently to confirm it’s secure.
4. Adjust for Balance: If your camera setup is heavy or uneven (e.g., with a large lens), use the tripod head’s adjustments to balance the load.
---
5. Optimizing Your Setup for Stability and Functionality
A stable tripod setup enhances the quality of your shots. Consider these tips:
- Weight Distribution: Distribute the weight evenly across the tripod legs. For uneven terrain, adjust leg lengths to maintain stability.
- Tripod Load Capacity: Ensure your tripod can support the weight of your camera and accessories. Check the manufacturer's specifications.
- Wind and Vibration: Use a tripod with a hook on the center column to hang a weight (like a camera bag) for added stability in windy conditions.
---
6. Troubleshooting Common Issues
When attaching a camera to a tripod, you might encounter some challenges. Here’s how to resolve them:
- Camera Slipping or Rotating: Ensure the QR plate is tightly secured. Use plates with rubber grips for added friction.
- Tripod Head Doesn’t Lock Properly: Inspect the locking mechanism for wear or damage. Replace faulty components as needed.
- Uneven Tripod Legs: Double-check the leg locks and adjust for balance.
- Camera Not Sitting Level: Use the bubble level or adjust the tripod head.
---
7. Practical Scenarios and Adjustments
Different shooting scenarios require specific tripod setups. Here are a few examples:
- Landscape Photography: Use a wide stance for stability. A ball head is ideal for precise adjustments.
- Portrait Photography: Ensure the camera is securely tilted for vertical framing.
- Video Recording: Use a fluid head for smooth pans and tilts.
- Macro Photography: Consider a tripod with adjustable angles for close-up shots near the ground.
---
8. Maintaining Your Tripod and Camera Setup
Proper maintenance ensures your tripod remains reliable:
- Regular Cleaning: Remove dirt, sand, and moisture after outdoor shoots.
- Inspect Moving Parts: Check locks, screws, and joints for wear. Replace parts as needed.
- Store Safely: Keep the tripod in a protective case when not in use to avoid damage.
---
9. Conclusion: Confidence in Camera Stability
Mastering the process of fixing your camera on a tripod empowers you to take sharper, more professional-quality photos and videos. By understanding your tripod’s components, preparing the setup carefully, and addressing common issues, you’ll ensure a secure connection between your camera and tripod. Whether you’re capturing breathtaking landscapes, detailed close-ups, or dynamic videos, the stability offered by a well-mounted tripod will elevate your work.
Invest time in practicing these steps, and soon attaching your camera to a tripod will feel as natural as clicking the shutter button. With a solid foundation in tripod setup, your creativity can take center stage, and your shots will reflect the precision and care you’ve put into your craft.


")
")


 HD Adjustable Neutral Density Filter with 28 Multi-Layer Coatings for Camera Lenses - Nano-X Series")


")


